Transforming Ikea FJELL Dressers into Custom Nursery Built-Ins: A Comprehensive DIY Guide
Embarking on a home improvement journey, especially one involving custom built-ins, can be incredibly rewarding. This past week has been a whirlwind of activity, but immensely productive, as we’ve made significant strides in transforming ordinary Ikea FJELL dressers into stunning, integrated built-in units for our nursery. Get ready for an in-depth exploration of the challenges we faced, the innovative solutions we implemented, and the detailed steps that brought our vision to life. From intricate carpentry adjustments to meticulous finishing techniques, this guide will provide you with all the nitty-gritty details to inspire your own DIY built-in projects.
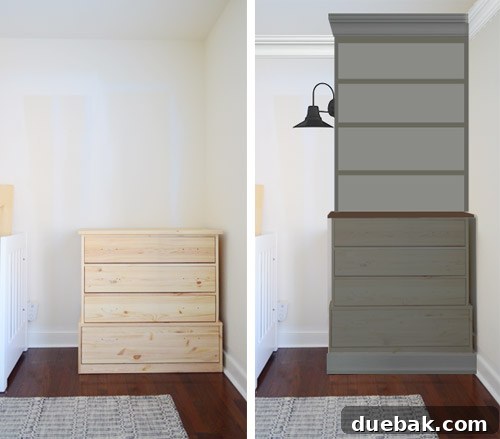
Our initial sketch envisions the transformation of a simple Ikea dresser into a functional built-in dresser/bookshelf combo.
The Vision: Why Custom Built-Ins for the Nursery?
The decision to opt for built-in furniture in our nursery was driven by a desire for a seamless, custom look that maximizes space and provides both storage and aesthetic appeal. Built-ins offer unparalleled integration, making a room feel larger, more organized, and intentionally designed. For a nursery, safety and stability are paramount, and custom built-ins allow us to securely anchor furniture, mitigating tip-over risks. We chose two Ikea FJELL dressers as our starting point, primarily for their ideal size and solid wood construction—a crucial factor for durability and the ability to make modifications. However, achieving that coveted built-in appearance required addressing a few inherent design challenges:
- The Indented Side Profile: The FJELL dresser’s design included an indented side profile, which prevented it from sitting flush against the wall. This design choice created a noticeable gap that would undermine the ‘built-in’ aesthetic and needed to be meticulously filled.
- Existing Baseboard Obstructions: Standard room baseboards along both the side and back walls prevented the dresser from hugging the walls tightly. This common issue with freestanding furniture required a precise solution to ensure the unit could sit as far back and to the side as possible.
- Inadequate Bottom Drawer Clearance: The bottom drawer of the FJELL dresser sat too close to the floor. This posed a problem for our plan to wrap continuous baseboards around the base of the new built-in unit, which was essential to complete the custom, integrated look.
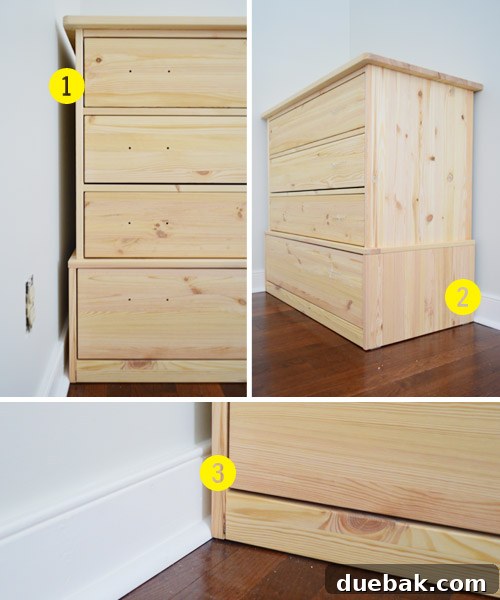
Identifying the key areas where the Ikea FJELL dresser failed to sit flush against the wall, highlighting the challenges we needed to overcome.
Essential Tools and Materials for Your Built-In Transformation
Before diving into the construction, gathering the right tools and materials is crucial for a smooth and successful project. Here’s a list of what we used:
- Ikea FJELL Dressers: Two units (or as many as your project requires).
- Dremel Multimax Oscillating Tool: Ideal for precise cuts in baseboards.
- Utility Knife: For scoring paint and clean separations.
- Pry Bar/Crowbar: For safely removing trim.
- Tape Measure & Pencil: For accurate marking.
- Table Saw: Essential for precise cuts on larger wood pieces like the dresser top.
- Miter Saw: For cross-cutting smaller wood pieces (e.g., filler strips).
- 2×4 Framing Lumber: For creating the base/platform.
- Kreg Jig & Heavy Duty Screws: For strong, hidden joinery on the base.
- Stud Finder: Crucial for securely anchoring the built-ins to wall studs.
- Drill/Driver: For pre-drilling and driving screws.
- 3/4″ Thick Scrap Wood (e.g., 1×2 pine): For filling side gaps.
- Wood Stain (Minwax Dark Walnut): For the dresser tops.
- Acrylacq Sealer: A non-toxic sealer for stained wood.
- Wood Putty: For sealing knots and imperfections.
- Wood Glue: Another layer of protection against knot bleed-through.
- Kilz Premium Primer (VOC-Free): For preparing wood surfaces for paint.
- Advance Paint (Benjamin Moore Senora Gray): A durable, self-leveling, low-VOC paint for furniture and cabinetry.
- Paint Rollers, Brushes, Drop Cloths, Sandpaper (various grits): Standard painting supplies.
- Caulking Gun & Caulk: For finishing seams.
- Baseboard & Shoe Molding: To complete the integrated look.
Phase 1: Achieving a Flush Fit – Tackling Baseboards and Overhangs
Step 1: Removing Existing Baseboards
The first hurdle was the existing baseboard. This is a common challenge when integrating any piece of freestanding furniture. The solution, while seemingly drastic, is straightforward: cut it out. Accurate marking is key here. I carefully positioned the dresser where it would ultimately sit and marked the lines for my cuts. It’s important to anticipate movement; when the side baseboard is removed, the dresser will shift left, and removing the back baseboard allows it to sit further back. These small adjustments ensure your marks lead to a perfect fit.
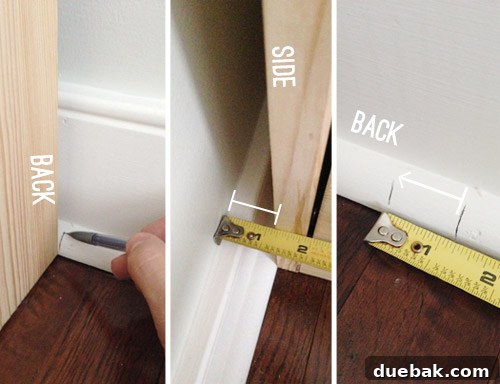
Careful measurements are essential to precisely mark the sections of baseboard that need to be removed.
To make the cuts, I relied on my Dremel Multimax oscillating tool, which is incredibly useful for precise, controlled cuts in tight spaces. To protect the floor from accidental damage, I placed a metal radiator cover underneath the cutting area. While any protective barrier would work, the metal grate provided an audible warning if my blade strayed too close, acting as a crucial safety measure.
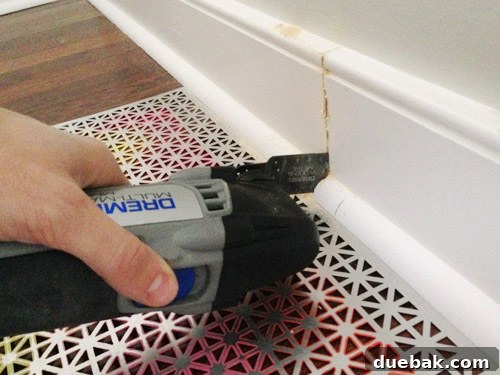
The Dremel Multimax makes quick work of cleanly cutting through the existing baseboard, ensuring a snug fit for the built-in.
Once the cuts were made through the baseboard, I used a utility knife to score the seam where the baseboard met the wall. This vital step prevents wall paint from peeling off with the baseboard, ensuring a clean removal and less patching later. After scoring, I gently pried off both the quarter-round and the baseboard pieces using a pry bar.
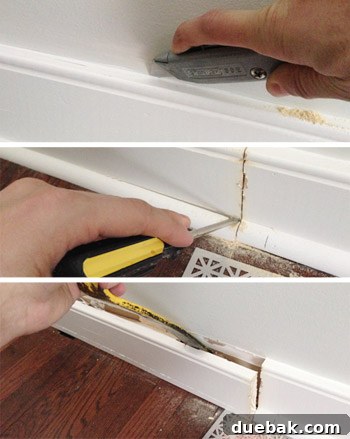
After scoring, the baseboard and quarter-round are carefully pried away, revealing the cleared space for the built-in.
Step 2: Addressing the Top Overhang
With the baseboards removed, I eagerly pushed the dresser into its new corner, only to discover a new obstruction: the dresser’s top piece. It was slightly larger than the base, creating an overhang that prevented a truly flush fit against the wall. This unexpected setback required another modification.
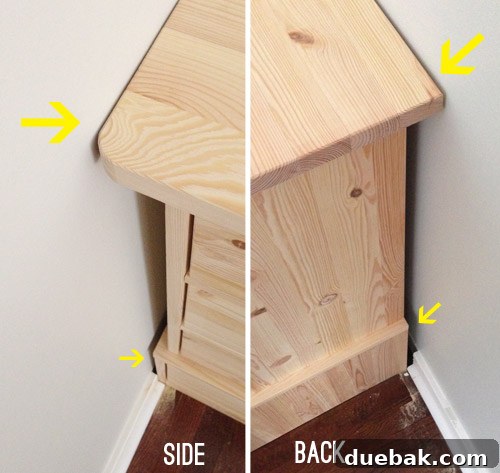
Even with baseboards removed, the dresser’s top overhang created an unwanted gap, highlighting the need for further modification.
After a quick consultation, we decided to trim a small portion off the top. Being an IKEA product, the FJELL dresser’s top was relatively easy to detach. I marked the precise amount that needed to be removed, taking care to write the measurements on the side to be trimmed, preventing any accidental cuts on the wrong end. This attention to detail is crucial for maintaining the integrity of the piece.
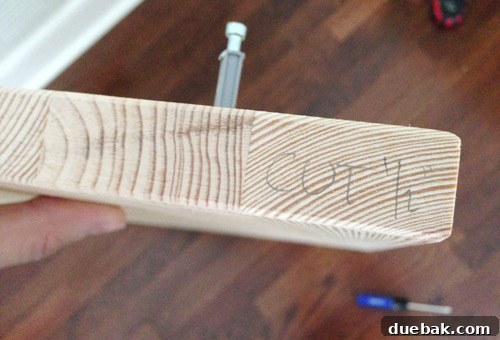
Precise markings ensure that only the necessary amount is trimmed from the dresser top for a perfect, flush fit.
Down in the workshop, I used my table saw, setting the guide to the marked measurement, and smoothly sliced off the excess from both sides. This step truly highlighted the advantage of choosing a solid wood dresser; particle board can be notoriously difficult to cut cleanly, often resulting in chipping or crumbling. The solid wood of the FJELL allowed for a clean, crisp cut, essential for a professional finish.
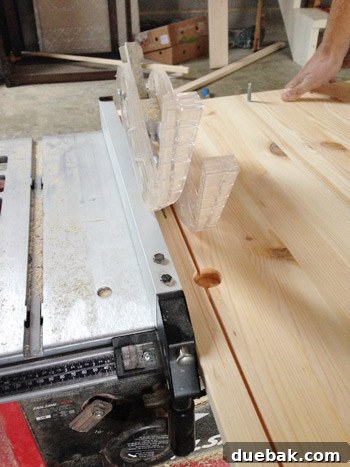
Utilizing a table saw for precise cuts, a crucial step in ensuring the dresser top fits perfectly flush against the wall.
Step 3: Filling the Side Gap
With the top trimmed and reattached, the dresser now sat perfectly flush against the back wall. However, the indented side profile still left a noticeable gap along the side wall (problem #1). Fortunately, this particular gap measured exactly 3/4″, which presented an easy solution.
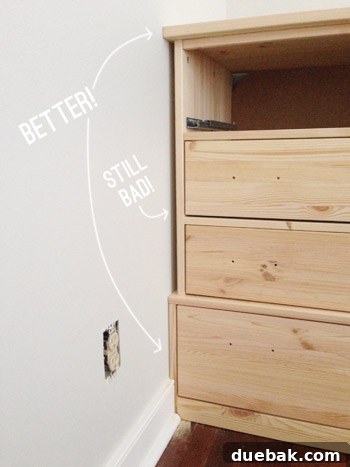
Even after adjustments, a persistent gap along the side highlighted the need for a custom filler piece.
I simply cut a piece of 1×2 scrap wood to the correct length using my miter saw. This 3/4″ thick piece fit snugly into the gap. While it was tight enough to stay in place on its own, for added security and stability, I drove a couple of nails through the dresser’s side into the filler piece. This small addition creates a seamless transition from the dresser to the wall, achieving that desired built-in look.
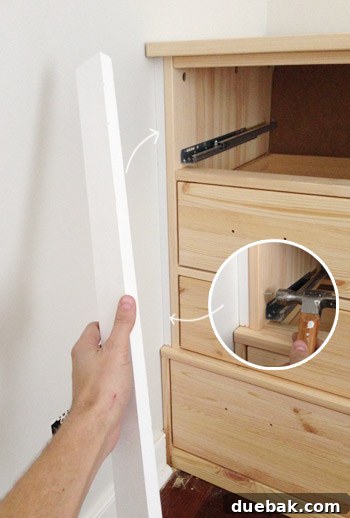
A precisely cut 1×2 wood strip perfectly fills the remaining gap, ensuring a seamless, integrated look for the built-in.
Phase 2: Building the Base and Securing for Safety
Step 4: Creating a Custom Base Platform
The final structural issue (problem #3) involved raising the entire dresser to accommodate new wrap-around baseboards. We needed to lift the dresser approximately 3.5 inches off the ground to ensure the bottom drawer wouldn’t be obstructed. A simple yet sturdy platform seemed like the ideal solution.
Since this base would not be visible, we opted for readily available and strong 2×4 framing lumber. I cut the pieces to form a rectangular frame that would sit just under the dresser. For robust and hidden joinery, I used my Kreg jig to create pocket holes, then secured the pieces together with heavy-duty screws. This method provides immense strength and stability, crucial for supporting the dresser and its contents.
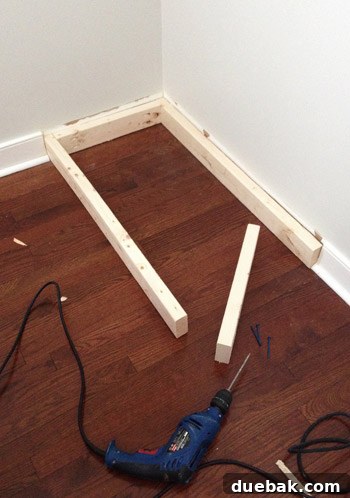
A sturdy base constructed from 2×4 lumber provides the necessary elevation for the dresser, ready to accommodate new baseboards.
The dresser (without its drawers for easier maneuvering) was then carefully placed directly on top of this newly constructed base. Interestingly, I didn’t permanently attach the dresser to the base at this stage, as the upcoming securing process would integrate both components into a single, rock-solid unit.
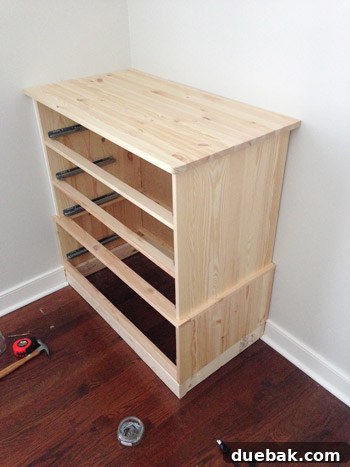
The FJELL dresser sits atop its newly constructed 2×4 base, gaining the essential height for the built-in aesthetic.
Step 5: Anchoring for Ultimate Stability and Safety
Securing the entire built-in unit firmly in place was a paramount concern, especially given its intended use in a nursery. Preventing any movement—particularly tip-over risks, which are a real concern with dressers when multiple drawers are pulled out—was our top priority. I used a stud finder to locate as many wall studs as possible along both the side and back walls. Then, I carefully drilled through the solid wood of the dresser (avoiding thinner backing pieces for maximum hold) and into the studs.
This anchoring process not only ensured the dresser was perfectly flush against the wall but also merged the dresser and its custom base into an incredibly stable, unmovable unit. The peace of mind knowing these built-ins are rock-solid for our baby’s room is invaluable.
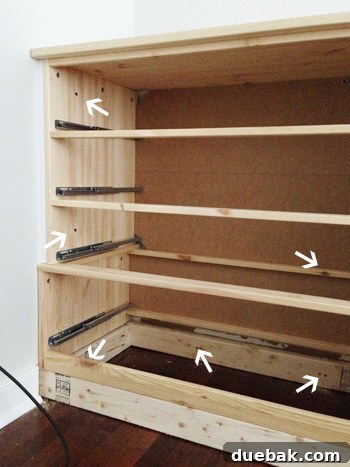
Strategic placement of screws secures the dresser to both the wall studs and its 2×4 base, ensuring maximum stability and safety.
While the steps described might seem straightforward, the careful measuring, cutting, and securing involved meant that each dresser took approximately a full day to complete. And since we were building two, this phase alone consumed a significant amount of time and effort.
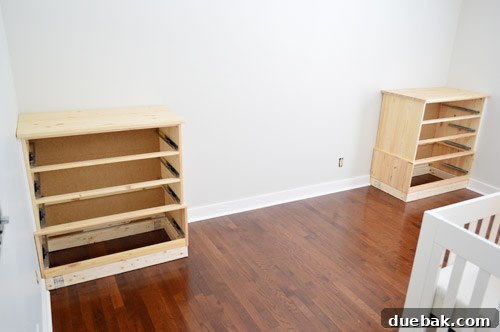
Both Ikea FJELL dressers are now structurally integrated into the nursery, forming the robust base for our custom built-ins.
Phase 3: The Art of Finishing – Staining and Painting
At this point, logic dictated a pause in construction. Before proceeding with the upper bookshelf components, it was far more efficient to complete the painting and staining. Finishing these steps while the components were still apart would significantly reduce the need for meticulous edging and taping later, ultimately saving time and ensuring a cleaner, more professional final look.
Step 6: Staining the Dresser Tops
We decided the dresser tops would benefit from a rich, contrasting stain to highlight their natural wood grain texture. We had two favorite wood stains on hand: Red Mahogany and Dark Walnut. To make an informed decision, we didn’t just rely on the color on the cans; we referenced existing projects in our home that featured these stains.
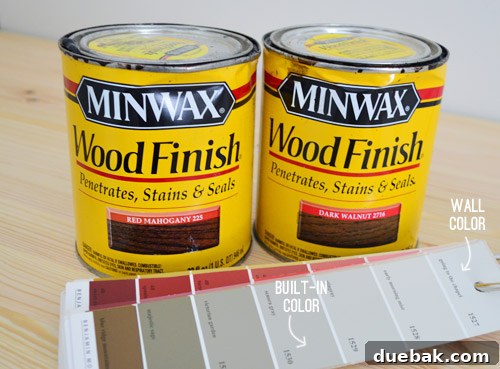
Choosing between two classic Minwax wood stain colors: Red Mahogany and Dark Walnut.
Clara’s dresser sported Red Mahogany, while my bike frames were finished in Dark Walnut. In person, the Dark Walnut proved to be a closer match to our existing floors and perfectly complemented the bike frames that would also reside in the nursery, making the decision clear.
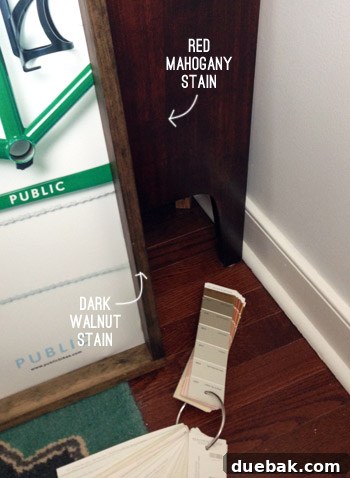
A side-by-side comparison reveals the subtle differences between Dark Walnut and Red Mahogany, guiding our final choice.
After detaching the tops, I moved them to the garage for staining. Each top received two coats of Minwax Dark Walnut stain, carefully applied with a brush to ensure even coverage and penetration into the wood grain. Following the staining, Sherry applied two coats of Acrylacq sealer. This non-toxic, eco-friendly sealer is exceptional for locking in any potential off-gassing from the stain, making it an ideal choice for a nursery environment. Although this step stretched over four days due to drying times, each application was quick, with patience being the primary requirement.
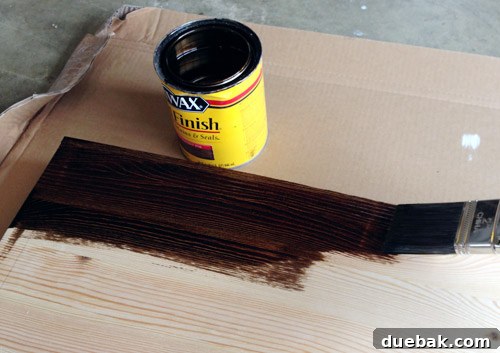
Carefully applying a coat of Minwax wood stain with a brush, bringing out the rich tones of the dresser tops.
Step 7: Preventing Knot Bleed-Through
While the tops were drying, we focused on preparing the dresser bases for paint. A significant concern, one that many experienced DIYers warn about, is knot bleed-through. Strong wood knots contain resins that can seep through layers of primer and paint over time, causing unsightly yellow or brown stains on the finished surface, even through multiple coats.
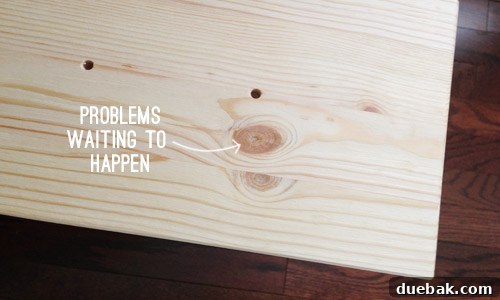
A prominent wood knot, a potential source of bleed-through, requires special attention before priming and painting.
Thanks to helpful advice and a bit of research, we employed a two-pronged approach to combat this issue. First, I covered each prominent knot with wood putty. The idea is that the putty creates a physical barrier, sealing the knot and preventing resin migration. This technique was quite time-consuming, given the sheer number of knots on the FJELL dressers. Sanding down the dried putty with a palm sander required a delicate touch—too much pressure and the putty would be removed entirely; too little and the surface wouldn’t be smooth. We aimed for a thin, even glaze of putty over each knot, which provided a reassuring layer of protection.
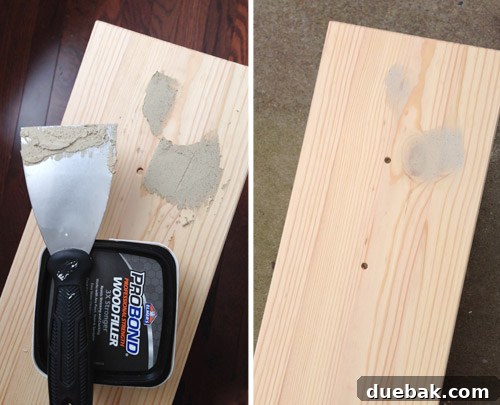
Applying wood putty over stubborn knots provides a crucial barrier against bleed-through, ensuring a pristine paint finish.
As a second line of defense, Sherry applied a thin layer of regular wood glue over the puttied knot areas. This internet-sourced trick was surprisingly effective and much faster than the putty application. The glue spreads easily and dries quickly, creating another seal without generating any dust from sanding. While a shellac-based primer is often recommended for knot blocking, we prioritised a fume-free environment for the nursery. Our choice, Kilz Premium, is VOC-free and has proven effective on our kitchen cabinets, which also had their share of knots. The combination of putty and glue provided excellent added insurance, and we’re happy to report that after several days, there’s been no hint of bleed-through.
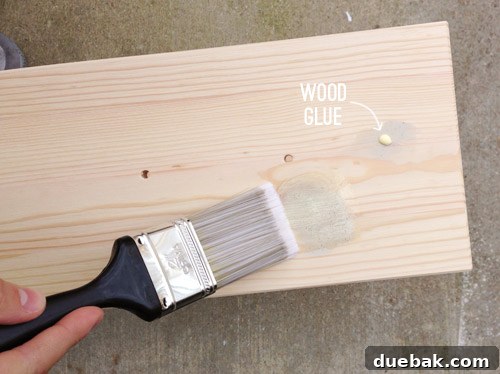
An additional layer of wood glue over the puttied knots offers enhanced protection against any potential resin bleed-through.
Step 8: Priming the Dressers
For priming, we used Kilz Premium, a high-quality, VOC-free primer. We even had some tinted Kilz Premium leftover from painting our bedroom dark blue, which worked perfectly for this project, allowing us to use up the can. While tinted primer isn’t strictly necessary, it can sometimes help with coverage, especially when painting a lighter color over a darker substrate.
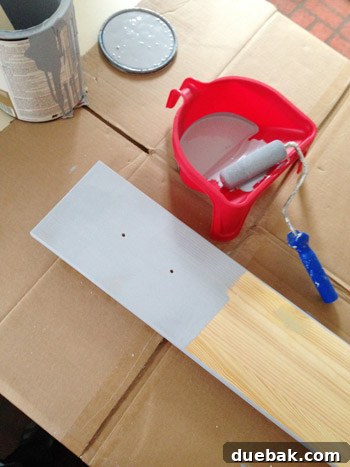
Applying tinted Kilz Premium primer to the wood drawer fronts, providing a solid base for the final paint color.
Sherry skillfully detached and rolled all the drawer fronts downstairs in the kitchen, where it was warmer than the garage. Meanwhile, I rolled the dresser bases in place upstairs, along with the pieces cut for the upper bookshelf build. This coordinated effort ensured efficient priming of all components, preparing them for the next stage.
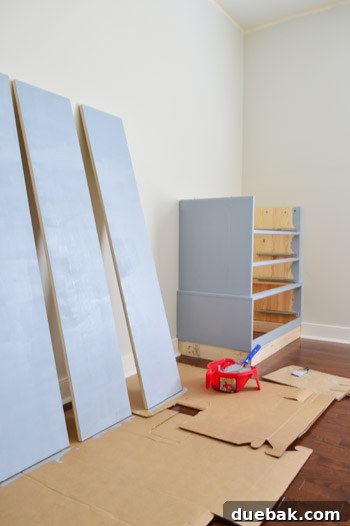
Primed components of the Ikea FJELL dresser patiently await their first coat of paint, laying the groundwork for a smooth finish.
Step 9: Painting with Precision – The First Coat
With the primer thoroughly dry, it was time for the first coat of paint. We chose Benjamin Moore Advance paint in Senora Gray. Advance is specifically formulated for furniture and cabinetry, offering excellent durability, self-leveling properties for a smooth finish, and low-VOC content, making it a healthy choice for a nursery. We’ve used this paint on our office cabinets in our previous home (which endured significant wear and tear from our daughter’s wooden trains) and in our last two kitchens, consistently impressed by its robust finish.
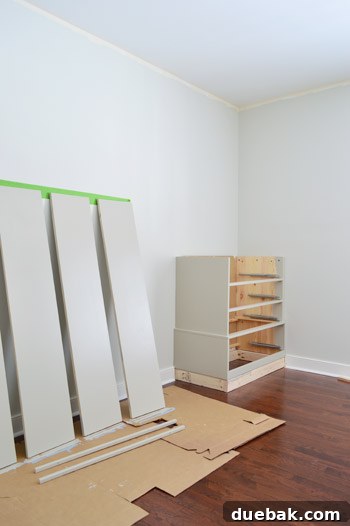
The first coat of paint brings the dresser pieces closer to their finished look, drying evenly for a professional appearance.
Upon initial application, the Senora Gray color gave us a momentary fright; it appeared surprisingly light and somewhat beige. We triple-checked the paint swatch and the can to ensure it had been mixed correctly. Fortunately, as it dried, the color deepened considerably, transforming into the elegant, sophisticated shade we had envisioned. This reminded us that wet paint often looks quite different from its dried counterpart.
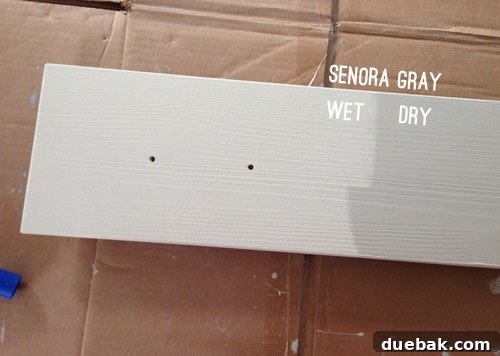
A visual comparison highlights the dramatic shift in Benjamin Moore Senora Gray paint color from wet to dry, revealing its true depth.
Step 10: Color Choice Reflections and Finishing Details
Even after seeing the dried paint, we admit to a brief second-guessing phase. The Senora Gray turned out lighter than our initial Photoshopped rendering. Our color inspiration actually came from a Ballard Designs image Sherry found, leading us to pair Senora Gray for the built-ins with “Going To The Chapel” for the walls. (More details on that process can be found in this post.)
The lighter outcome meant less contrast with the wall color than we initially expected, despite the paint chip being four shades darker. However, we quickly recognized this as a “blessing in disguise.” The reduced contrast between the built-ins and walls actually allows the stained wood tops and the hardware to “pop” even more, creating a lovely focal point. Furthermore, while we might gravitate towards moodier built-ins for our own spaces, we consistently reminded ourselves this is a room for a little boy, with only one window. Keeping things lighter contributes to a brighter, more cheerful atmosphere, which is undoubtedly a positive.
After applying both coats of paint and allowing ample drying time, we reassembled everything, including the beautifully stained tops and the original FJELL hardware. We also began attaching the new baseboard and shoe molding around the base of the built-ins. These trim pieces will also be painted in Senora Gray, creating a seamless, integrated look from top to bottom. A final step of caulking will ensure all seams are perfectly smooth and ready for paint.
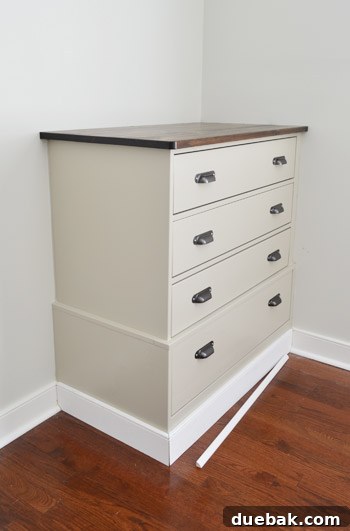
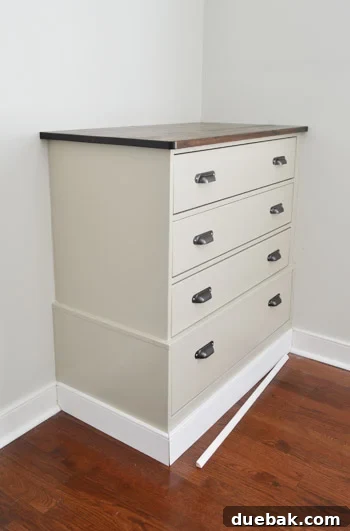
The Ikea FJELL dresser hack nears completion, showcasing the integrated baseboard for a fully customized built-in appearance.
Update on Trim Color Strategy:
Many readers often inquire about our decision to paint the baseboard (and future crown molding) to match the built-ins rather than keeping them white. Our preference stems from a desire for a cohesive, monolithic look. We believe that an entire piece, from floor to ceiling, in the same tone creates a more custom and architectural feel, as opposed to drawing attention to elements like baseboards or crown molding with a contrasting color. The stained wood top already serves as a beautiful accent, so a unified body color allows it to stand out even more. For a visual reference, you can see an example here of painted built-ins with matching baseboards and crown, a look we deeply admire.
The Journey Continues: What’s Next for the Nursery?
We are incredibly excited with how these built-in bases are shaping up! While they might seem a bit anticlimactic without their upper bookshelf components yet, reaching this stage feels like a huge accomplishment. All the careful planning, measuring, cutting, and painting have truly paid off, and we’re reveling in the partially complete, yet already impressive, transformation.
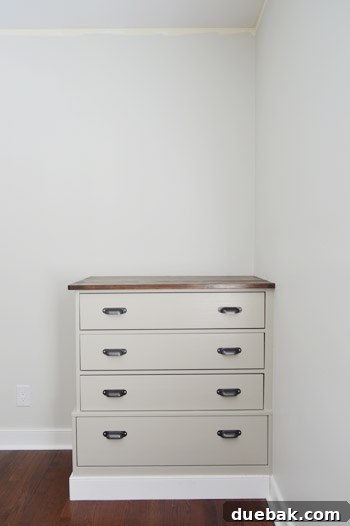
The finished Ikea FJELL dresser base now serves as a robust and elegant foundation for the upcoming built-in bookshelf.
Update on Indented Detail:
A few readers have asked if we considered filling the indentation on the inside edge of each dresser for a more uniform balance. In person, we actually quite love this architectural detail! We feel it adds a unique character and, once the crib is placed between them, it will serve as a lovely subtle accent. Of course, the beauty of DIY is flexibility, so we might revisit this decision down the road, but for now, we’re embracing its distinct charm. We’ll certainly keep you posted if our minds change!
Assuming the next few days remain on schedule, we anticipate having these built-ins completely finished—extended to the ceiling and fully primed/painted—by Wednesday or Thursday. This is a massive relief, as I initially thought completing this task before our baby boy arrived would be a stretch. It turns out I may have slightly overestimated the complexity, though the dedication required was certainly significant!
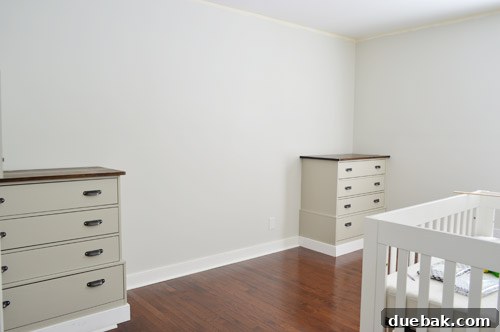
The boys’ nursery begins to take shape with two Ikea FJELL dressers expertly integrated into the corners as custom built-ins.
Crossing off this major project from our to-do list with ten weeks to spare leaves us excited for all the “fun stuff” still to come. Sherry is particularly eager to tackle bedding, mobile-making, art selection, curtain installation, painting a bold green closet door, adding sconces and a new light fixture, and creating an exciting feature wall between the built-ins where the crib will be placed. The journey to a complete nursery is well underway!
More Built-In Storage Project Inspiration
If you’re feeling inspired to tackle your own built-in cabinet projects, we’ve completed similar transformations in several spaces. Be sure to check out these posts for more ideas, tips, and inspiration:
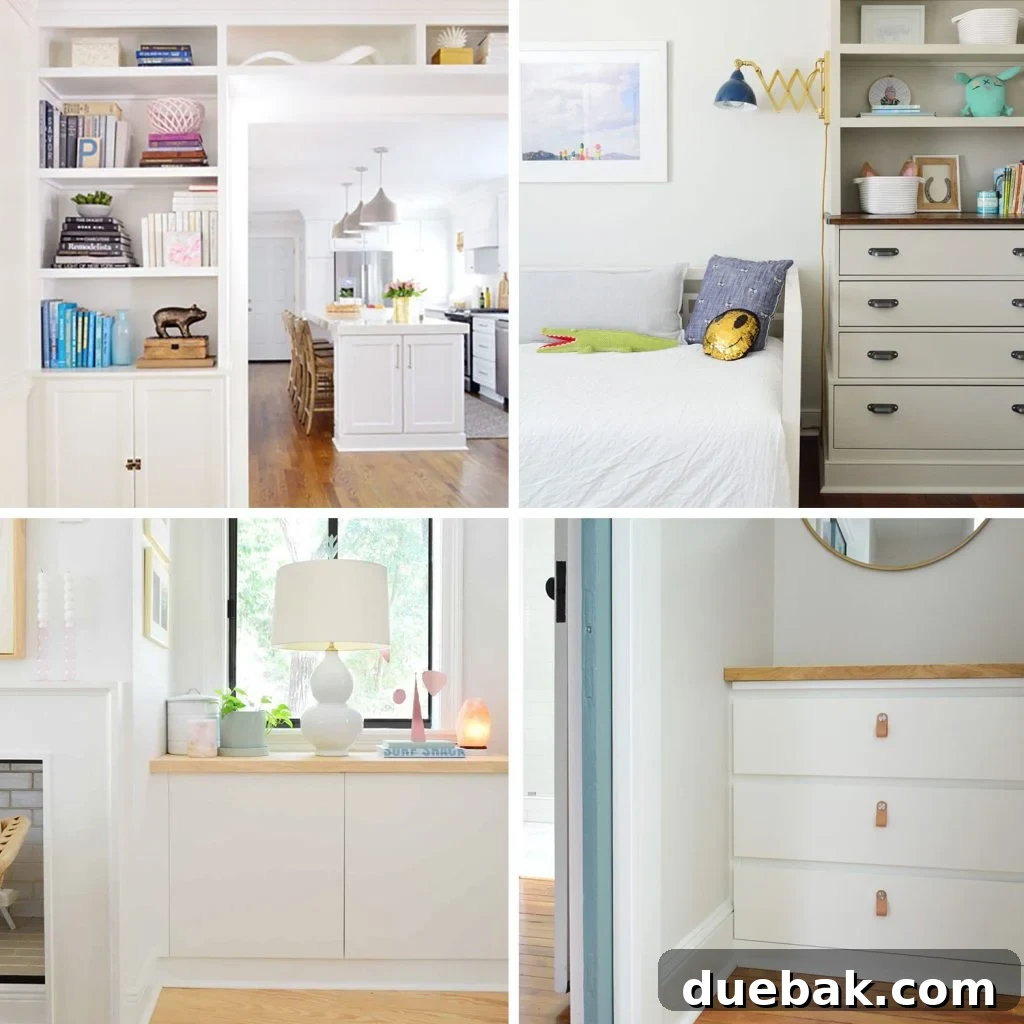
- Ikea Besta Hack Into Built-In Cabinets: Maximizing Style and Storage
- Built-In Playroom Storage Using Ikea Cabinets: Creating Functional Family Spaces
- Built-In Bookshelves Using Stock Cabinets: A Custom Look on a Budget
- Turning Ikea Dressers Into Bookshelf Bases: Smart Storage Solutions
- Built-In Dresser Out Of An Ikea Malm: A Seamless Bedroom Upgrade
- How to Make Ikea Pax Wardrobes Look Built-In: Achieve a High-End Custom Closet