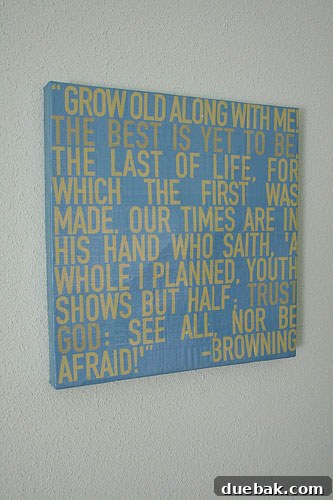
Transform Your Space: Creative & Eco-Friendly DIY Wall Art from a Pizza Box
When we first received Erin’s email, showcasing her incredibly cool DIY art project all the way from Spain, we were instantly captivated. Her ingenious approach to creating personalized decor not only ignited our creative spirit but also gave us a fresh perspective on repurposing everyday items. It was a project so innovative, it literally made us excited and, surprisingly, a little hungry for pizza!
Erin’s story began with a simple desire to personalize her living space, despite significant limitations. As she explained in her heartwarming letter:
“I just discovered your site today from a link at AT. It immediately became one of my permanent favorites! I’ve been inspired by the thrifty makeovers you’ve featured and wanted to share one of my own. My hubby & I live in an apartment in Spain. We’re only here temporarily, and our apartment is owned by the organization that we work for, so we’re not even allowed to paint the mint green walls. Last week, after finally becoming weary of blank walls, I succumbed to the crafty bug and created some ‘artwork’ for our bedroom. My mom brought me some Mod Podge when she came to visit, so I did my first decoupage project using laser prints of something I threw together in Photoshop and a large pizza box. I’d been saving the (clean!) pizza box for several months under the conviction that I could use it for something creative. The Browning poem I used is one that we had on our wedding invitations, so it means a lot to us personally. I’m pretty proud of how it turned out and wanted to share! Thanks for all the inspiration! – Erin”
Erin’s narrative perfectly encapsulates the essence of DIY: resourcefulness, personal touch, and the sheer joy of creating something beautiful from humble beginnings. Her project isn’t just about making art; it’s about making a temporary space feel like home, imbuing it with personality and warmth, and doing so on an almost non-existent budget.
The Inspiration Behind the Art: Making a Temporary House a Home
Living in a temporary apartment, especially one with strict rules against personalization like painting, can be a challenge for anyone who craves a comfortable and reflective living environment. Erin and her husband found themselves in this exact predicament, facing mint green walls that offered little comfort or inspiration. This common scenario often leads people to believe that home decor is out of reach, especially when budgets are tight or rental agreements are restrictive. However, Erin’s experience proves that creativity knows no bounds. Her decision to tackle those blank walls demonstrates a powerful desire to infuse their temporary dwelling with personality and a sense of belonging.
Her inspiration, drawn from thrifty makeovers featured online, sparked an idea that would transform a discarded item into a cherished piece of decor. This highlights a crucial aspect of DIY home decor: finding inspiration in unexpected places and seeing potential where others might only see waste. The beauty of such projects lies not just in the finished product but in the story and ingenuity behind them.
Why Repurposed Art is the Ultimate Home Decor Hack
Erin’s choice to use a pizza box isn’t just quirky; it’s a testament to the growing trend of sustainable and budget-friendly decor. Repurposed art offers a myriad of benefits:
- Eco-Friendly: Diverting items like cardboard pizza boxes from landfills reduces waste and promotes a more sustainable lifestyle. It’s a small step that collectively makes a big difference.
- Cost-Effective: Creating art from repurposed materials dramatically cuts down on expenses. Instead of buying expensive canvases or framed prints, you’re using items you already have or can acquire for free.
- Unique & Personalized: Mass-produced art can feel impersonal. DIY repurposed art, however, allows for complete customization. You choose the materials, the theme, the colors, and the sentiment, resulting in a piece that truly reflects your style and story.
- Accessible to Everyone: You don’t need to be a professional artist to create stunning repurposed art. Many techniques, like decoupage, are beginner-friendly and require minimal specialized tools.
- Creative Outlet: Engaging in DIY projects provides a fantastic creative outlet, offering a sense of accomplishment and a therapeutic escape from daily routines.
The Magic of Decoupage: Simple Yet Stunning Transformations
At the heart of Erin’s project is decoupage, an art form that has been around for centuries and involves decorating an object by gluing colored paper cutouts onto it in combination with special paint effects, gold leaf, and other decorative elements. Finally, the object is covered with multiple coats of varnish or lacquer, creating an illusion of depth and painting.
For beginners, decoupage is incredibly forgiving. It’s an excellent way to transform ordinary items into extraordinary pieces without needing advanced artistic skills. Mod Podge, the adhesive Erin used, is a crafter’s best friend – an all-in-one glue, sealer, and finish that simplifies the process and delivers professional-looking results. Its versatility means it can be applied to almost any surface, from wood and metal to glass and, as Erin brilliantly demonstrated, even a humble pizza box.
A Step-by-Step Guide to Your Own Pizza Box Masterpiece
Inspired by Erin’s success, here’s how you can embark on your own repurposed wall art journey, transforming a forgotten pizza box into a personalized decor statement:
1. Gathering Your Unexpected Supplies
Erin’s “arsenal of unexpected supplies” perfectly illustrates that often, the most creative projects start with the simplest things:
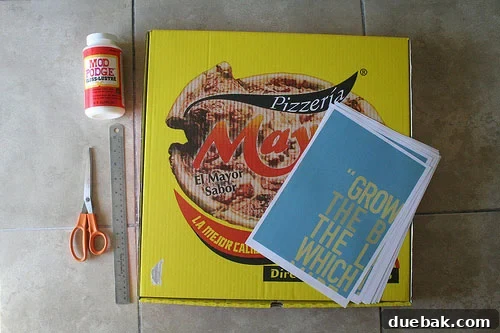
- Clean Pizza Box: The star of the show! Ensure it’s clean and free of grease. A large, sturdy box is ideal for a substantial piece.
- Mod Podge: Your all-in-one adhesive, sealer, and finish. Available in various finishes (matte, gloss, satin).
- Laser Prints or Paper Cutouts: This is where your personality shines! Erin used laser prints of a Photoshop design and a meaningful poem. Other options include:
- Personal photographs (ensure they are laser printed to prevent ink bleeding).
- Magazine cutouts, old book pages, sheet music.
- Fabric scraps with interesting patterns.
- Hand-drawn illustrations or quotes.
- Scissors or Craft Knife: For precise cutting of your paper elements.
- Foam Brush or Paintbrush: For applying Mod Podge smoothly.
- Browning Tool or Old Credit Card: To smooth out wrinkles and air bubbles.
- Optional: Acrylic paints, glitter, stencils, or other embellishments to add extra flair.
2. Designing Your Vision: Personalization is Key
Before you start gluing, plan your design. Consider the overall aesthetic you want to achieve. Erin’s choice of a Browning poem from her wedding invitations adds deep personal significance, making the artwork far more than just decoration. Think about what truly resonates with you:
- Themes: Nature, travel, abstract patterns, vintage aesthetics.
- Colors: Complement your existing decor or introduce a pop of contrast.
- Sentiment: Quotes, song lyrics, or personal memories that hold special meaning.
If you’re using digital designs, like Erin did with Photoshop, experiment with layouts and fonts until you achieve your desired look. Remember to print your designs on paper that isn’t too thick, as it will be easier to work with during the decoupage process.
3. The Decoupage Process: Bringing Your Art to Life
- Prepare Your Surface: Ensure your pizza box is completely clean and dry. If desired, you can paint the box with a base coat of acrylic paint to cover any logos or to create a background color that complements your prints. Let it dry completely.
- Cut Your Prints: Carefully cut out your chosen paper elements. Precision is key, especially if you’re creating a collage or a specific pattern.
- Apply Mod Podge (Base Layer): Using your brush, apply a thin, even layer of Mod Podge to the section of the pizza box where you want to place your first paper cutout.
- Position and Smooth: Carefully place your paper cutout onto the wet Mod Podge. Starting from the center and working outwards, gently smooth out any wrinkles or air bubbles using your fingers, a browning tool, or an old credit card. Work slowly to avoid tearing the paper.
- Repeat: Continue this process for all your paper elements, overlapping if desired to create a collage effect. Allow ample drying time between layers if you’re building up significant depth or multiple overlapping pieces.
- Seal with Mod Podge (Top Coats): Once all your paper elements are in place and the underlying Mod Podge has dried (usually 15-20 minutes), apply several thin, even coats of Mod Podge over the entire surface of your artwork. Allow each coat to dry completely before applying the next. This creates a durable, sealed finish that protects your artwork and gives it a unified appearance. Three to four coats are typically recommended for a good seal.
- Final Curing: Mod Podge typically takes 24 hours to fully cure, although it may feel dry to the touch sooner. During this time, handle your artwork carefully.
The Finished Product: A Testament to Creativity and Personal Style
And the finished product, a beautiful blend of personal sentiment and thrifty ingenuity:
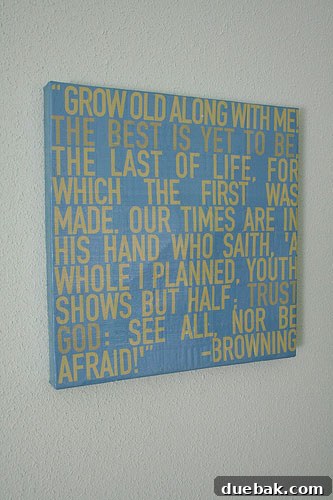
Erin’s completed artwork is a stunning example of how cheap wall art can be both elegant and profoundly meaningful. The simple yet impactful design, coupled with the personal significance of the Browning poem, transforms a discarded item into a cherished centerpiece for their bedroom. It’s a powerful reminder that true beauty and value in decor often come from the heart and hands that create it, not from a hefty price tag.
Beyond the Pizza Box: Expanding Your Creative Horizons
Erin’s project serves as a launchpad for countless other DIY wall art ideas. Once you’ve mastered the art of decoupage with a pizza box, you’ll see potential everywhere! Consider these other repurposed materials for your next creative endeavor:
- Old Cereal Boxes or Cardboard: Cut into geometric shapes and decoupaged with different patterns to create a modern mosaic.
- Empty Cans: Transform into decorative planters or pencil holders using fabric scraps or painted designs.
- Glass Jars/Bottles: Decoupage with tissue paper for colorful lanterns or vases.
- Broken Dinnerware: Create stunning mosaic art pieces for garden paths or tabletops (with proper safety precautions).
- Old Books or Maps: Perfect for creating unique collages or abstract art.
The possibilities are truly endless when you start looking at everyday objects with a creative eye.
Tips for Successful DIY Wall Art Projects
Whether you’re decoupaging a pizza box or tackling a more complex project, here are some universal tips for ensuring success and enjoyment:
- Start Simple: Don’t try to create a masterpiece on your first go. Begin with smaller, less intricate projects to build your confidence and skills.
- Gather All Supplies First: A well-organized workspace makes the process much smoother and more enjoyable.
- Patience is a Virtue: Rushing can lead to mistakes. Allow ample drying time between layers and steps.
- Embrace Imperfection: Handcrafted items often have unique quirks. These aren’t flaws; they’re part of the charm and character that make your piece truly one-of-a-kind.
- Experiment: Don’t be afraid to try new techniques, materials, or color combinations. That’s where true innovation happens!
- Safety First: If using craft knives or power tools for other projects, always prioritize safety with proper handling and protective gear.
The Lasting Impact of DIY Decor
The trend of DIY home decor, especially projects involving creative reuse and repurposing, is more than just a fleeting fad. It represents a shift towards mindful consumption, personal expression, and a deep appreciation for the unique narrative that handmade items bring to a space. Erin’s pizza box art is a shining example of this movement. It’s personalized, pizza-inspired, and utterly charming. Mmmm, indeed!
It demonstrates that with a little imagination and resourcefulness, anyone can transform ordinary objects into extraordinary pieces of art, creating a home that truly reflects who they are, regardless of budget or rental restrictions. So, next time you finish a delicious pizza, think twice before tossing that box. It might just be the canvas for your next masterpiece!